Reed Organ Repair - A Generic Approach
By Jim Tyler
Can I do it myself?
Are you considering to do the reed organ restoration yourself? It can be done, but be sure to know the "do's and don'ts" of restoring. Jim Tyler wrote the following article that will help you through your restoration - be sure to read it first and then reference back to it throughout your first restoration. WARNING - once you complete your first restoration it will probably not be your last...
Should restoring be a daunting task or you just don't have the time, Contact the ROS councilor in your area to help find members who are qualified restoration experts.
Introduction
There are some museum curators who take the position that all reed organs, being more-or-less "old", should molder away in musty museums somewhere, to be played rarely (and only with permission!), and to be examined by scholars only if such are found worthy.
I do not subscribe to this view.
Reed organs are musical instruments. They should be preserved, they should be played, and they should be enjoyed. If you found a Stradivarius violin in your attic, no way would you put it into a museum to be drooled over by every violinist who passed by: it would be repaired, rebuilt, and used! In my book, the same goes for reed organs. Hence this treatise.
The person or persons contemplating repairing or rebuilding their reed organ should have the following attributes:
Working on a reed organ need not be a lonely job: a few compatible souls can get the job done faster, at least, and the companionship and pride in a job well done can then be shared. After all, the reed organ you have was built in a factory by dozens or hundreds of workers, probably no one of which ever paid any real attention to the completed instrument. Bear in mind also that in the factory, there were folks specializing in various parts of the instrument, but you have to know about all of it.
I recommend reading this treatise through before you start, and of course you can refer to it at any time. If you get in a jam, there are lots of aficiandos "out there" who will be happy to assist: don't hesitate to track them down and pick their brains! One last remark: this discussion treats of the typical reed organ, "parlor organ", or "pump organ". Much of what is described here also applies to melodeons and cabinet organs. However, if what you have is a true harmonium, very little of this is applicable. Harmoniums are pressure instruments, and altogether a "different breed of cat". Similarly, while my descriptions will try to
present some of the variations likely to be found, I can't cover the dozens of possibilities "out there". The instrument you have is likely to vary in some ways from what I describe here, but if you have the smarts, you can see that the basic operation of yours is the same as all of them.
Sidebar: How *does* it work?
Consider first the pressure harmonium, and use the following analogy: a typical "american" suction organ essentially reverses only the flow of air:
Your lungs provide the pressure (the lower action) Your glottal stop is the valve operated by each key Your vocal cords create the vibrations (as do the reeds) Your mouth is the chamber into which the reed speaks ("formative", in acoustic-talk) Your lips are the mute that shuts the sound on and off.
That formative is important. Just as you change the timbre of your voice by constantly re-shaping your mouth, the cavity into which a reed speaks can have a marked effect on the final sound (along with matters having to do with the scale and shape of the reed itself, of course). Some reed organs are fitted with "qualifying tubes" - chambers of various sorts into which one or more reeds are allowed to speak. The ultimate in this design is the Vocalion, which can have a bewildering variety of chambers to modify the sound.
Reed Organ Repair: A Generic Approach Part 1
Basics, Hot Glue, and Starting your Restoration
This treatise is intended for those who are tempted to fix up "Aunt Maude's old pump organ"that has languished in the attic since Maude went to her reward. You know it's up there, and "one of these days" ...
This treatise is NOT intended for those who seek to rescue Maude's organ if it's been stored in a leaky barn on the back forty for thirty years! Such a project has many pitfalls I won't address here, although the basics still apply. But an organ stored thus is likely to have MANY more problems than one that's been at least kept dry and free of rats, mice, moths, and wasps.
So, drag the poor thing into the garage, assemble some tools, and fix up a workbench A disassembled reed organ takes up a good deal of space: have an area set aside where the components can be stored without being bothered by pets or children. Decent lighting is essential. Later, you may have to order up some material.
Ah, yes! "Material": where to get that, and what will I need?
Possibly, you'll need nothing! Gotta get the thing apart first, and see what's wrong. The organ may just need a good cleaning and a few adjustments. Then again... You WILL need hot glue, by which I do NOT mean the gunk emitted from an electric glue-stick gun! Reed organs were universally assembled using hot glue, and it is the ONLY glue to use in repair work: no white glue, no yellow glue...
Hot glue requires a glue pot: a fully automatic one is expensive. A decent alternative is a small electric hotplate with a thermostat, a pan of water, a jar immersed in the water for the glue, and a simple meat thermometer. Dried (flake) glue can be obtained from Organ Supply Industries, or other sources. It is mixed like rice: two volumes COLD water, one volume flake glue: mix well, leave overnight (it swells up) then melt at 140 degrees F. If melted every day, hot glue will not spoil, but if left more than a few days, it grows "things". Prevent this by putting the jar in the fridge until needed.
You'll need a collection of brushes. Throw-aways are fine, and some artist's brushes in several small configurations will get you started. Once you have the knack of hot glue, you will wonder how you ever got along without it. Besides ease of use, it is fully water soluble, so the next person to work on the organ can have an easy time of it, just as you will, assuming no clod got into your instrument before you and used the wrong stuff. While many claim that "size isn't important", size IS important when using hot glue. Any *new* surface (not previously glued) to be joined using hot glue must be sized, which simply means painting the area with a dilute hot glue (make up a trifling amount by diluting your regular mix 1 to1 with hot water: when you are through with it put it back into your glue pot). This surface should dry completely before making up a new joint. Surfaces that have previously had hot glue on them usually don't need sizing, as the old glue serves this purpose. But when in doubt, size the joint: it cannot hurt at all, and may save a lot of grief.
Depending on the complexity of the organ, the first step is to get as much casework as necessary out of the way. Remove the back first and set it aside. The high-back (if present) usually has only a few screws holding it on: these may be driven from inside; remove these, and LABEL them! Envelopes, dishes, ice-cube trays, cat-food cans, baby-food bottles -- all are just fine for collecting the myriad screws you will be removing. LABEL all screws, with details about where the long and short ones go. It may be a while before you re-assemble the organ, and it's easy to forget. Get used to using B (= bass) and T (= treble) to indicate which end of the organ things go to. (R=right and L=left gets confusing, as it varies depending on your position with respect to the organ itself).
Remove the key-slip (in front, below the keys), any lid, music-rack or other items that might restrict access.
Most RO actions are built up from the bottom, so one works from the top down. As you disassemble the thing, you will likely ask yourself (as I do, often!) "Why on earth did they build it this way?" After all, a reed organ action is only a pneumatic cross-bar switch: the keys (on or off) are the switches, the mutes are the cross-bars. The almost endless variations on the theme seem to be related to the propensity for builders to patent *everything*; hence, when yet another company wished to capitalize on the popularity of the reed organ, they had to devise an action that would not infringe anyone else's patents. In so doing, they often created "monsters" that defy easy maintenance and repair. Nevertheless, we are now stuck with the design, so we have to live with it, and make it work again.
With the casework out of the way, you'll find some sort of linkages (wooden sticks, wires, or straps) that ultimately connect the stop-knobs to the mutes: these parts are usually at the extreme end of the action, (they may, however be arranged along the back of the stop action) and are made to be disconnected fairly easily. Label each one as you take it out, with clear indication of where it goes. Set them aside.
The stop-action, with knobs, action rods, and whatever, usually comes out as a sub-assembly, often with only a couple of screws at each end to hold it in place. Set this aside, taking care not to bend any items that may protrude underneath.
Note: Some actions can be removed from the case with the stop rail attached; others require the stop rail to be removed first (usually so you can reach some of the screws holding the action in place). In most cases, it is best to remove the stop rail before taking the action out of the case.
You want next to take out the "upper action" in its entirety. This is the shallow box on which everything you have exposed sits. There are usually long screws along the back and sides; the ones in front may be driven from the top, or up from below, and the ones along the sides are often difficult to find and reach. Once all the screws are found, removed and labeled, lift the upper action up (there are usually small locating pins somewhere) until it's completely free, and carefully extract it from the case (some actions must go out the back of the case, some only out the front, and only you can determine which yours requires!) Once the action is free and out of the case, set it aside, once again being careful not to damage the parts underneath. (Prop it up on chunks of wood if there are too many things protruding below).
Assuming you removed the stop rail earlier, you will now see the keys. And a lot of dirt, probably. Vacuum this dirt off, and look for pencil notations by others who've been ahead of you. Try not to remove any marks you find, as they are part of the instrument's history - even though you no longer have any clue as to who "Herman Ledbetter" is (or was).
The keys are another sub-assembly: the key-cheeks may be attached to the key bed (or may have been screwed to the case). Under the key-cheeks you'll find a couple of screws, and there's often one buried under the center key (or nearby). If this is the case, you must remove the strip along the back of the keyboard which retains the keys, and lift out one or two to access that pesky middle screw. There may be a couple of metal straps in front or back that have to be taken off as well. When it's loose, lift off the keyboard entire, and set it aside, again being careful of "thingies" that may protrude from beneath.
Below the keyboard you will find - more dirt! Vacuum this out: a dry paint-brush may help dislodge the stubborn stuff. At this level you will usually find the coupler action (if there is one) attached to whatever covers the goodies below. The coupler (there may be two halves) is removed, along with any actuating devices. Remember to LABEL *everything*! Next, remove the stickers, a neat row of which you see protruding up through the swell action. KEEP THESE IN THEIR ORIGINAL ORDER! You can drill a row of holes in a scrap of wood, or you can lay these out on sticky tape. DON'T just put them in a tray and hope for the best: if that tray gets tipped, you have a major problem!
Note: Earlier actions (usually) often have the stickers coming up through a transverse guide that is part of the keybed itself. In this situation, the keys must be removed from the frame before the stickers are lifted out. If this is necessary, number the keys (if they aren't already) neatly so they will go back in the correct order. It is *very* difficult to re-assemble a jumble of keys that have been dumped in a box.
Remove the swell action next: usually just a few screws. Also remove the tremolo fan or beaterbox sub-assembly, and the bass reeds sub-assembly (if there is one) as well. Keep track of those screws, and LABEL everything!
Now you're down to the "nitty-gritty": at this juncture, DON'T attempt anything more with the cavity-box or mutes, other than gentle vacuuming away of the dirt that's likely to be everywhere.
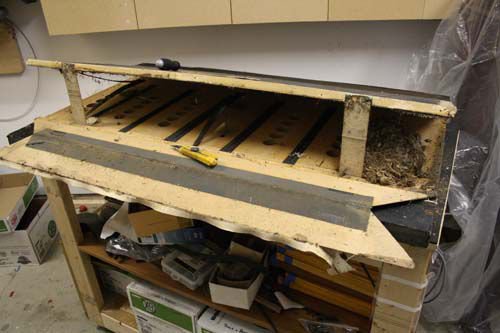
With the action out of the case, you are presented with the foundation, a wide board with a slit or some holes along the back, and perhaps a divider in the middle. You will see how it attaches to the lower action and the case: this whole contraption is usually another sub-assembly that can be removed entire. It consists of the foundation, the reservoir, and the exhausters. Details of how it's held in vary, but by now you should be adept at finding screws in odd places! It is important to remove the treadle springs, and disconnect the straps (if they aren't rotted off!) before taking out this "lower action". It may be necessary to lay the organ case on its back to access the treadle straps; the springs are usually reached through a removable knee-panel. When everything is disconnected, remove this action as a whole, and set it aside.
What to do next is in Part 2.
Reed Organ Repair: A Generic Approach Part 2
Cleaning the case Replacing Cloth, and Starting on the lower Action
Anything you plan to do to the organ's case should be undertaken next. Usually, cleaning is all that's necessary. Various formulations of beeswax were popular polishes when the organ was in regular use, and this has accumulated a lot of dirt. Murphy's oil soap on a damp rag is the best first-step, and is often all that's necessary to get this goop off. Liberal use of cotton swabs and/or toothbrushes may be required on ornate parts.
If the casework is really beat-up, you might have to re-finish it, (a long and messy process). But cleaning, touch-up with a dark stain on severe scratches, and re-waxing (paste wax) is usually all that's required. A few "dings" here and there attest to the instrument's age. SAVE the original finish if at all possible! If you have watched "Antiques Roadshow", you know how important original finishes can be to professional dealers.
It's time, too, to replace the silks behind any fretwork on the case or key-slip. Find something at the fabric store that comes as close to the original as possible. (It was most often a red cotton poplin, and has often been replaced with material much too thick. In removing whatever you find, look for shards of the original still glued underneath - this will tell you what color the original material was). Remove the old material, which invariably was glued on with hot glue. Warm water softens this easily, so the old material comes right off. A damp rag takes off excess glue, dirt and so forth. Get right down to the wood! You may find some *tiny* tacks here and there: try to extract and save them, as they're difficult to find, and you only need a few.
Cut pieces of the new material, observing the "grain" of it, and iron it on an ironing-board so it is dead flat and without creases. It's best to start with a piece that's over-size. Stretch the piece over the fretwork: it can be held in place temporarily with masking tape, or with those tiny tacks.
What glue to use? You *should* use hot glue, but liquid hide glue also works here. Hide glue can be warmed, too, which quickens its action. Fish glue also works. DON'T USE WHITE GLUE! Whatever your choice, you will apply the glue first to the fretwork, (usually just around the edges) then (after it dries at least to "tacky" and you have stretched the new material in place) to the back side of the work so that it soaks through the fabric and joins the glue on the wood below. You want the glue *only* where it was originally, and NOT over any area that shows through the fret-work. Just pressing the fabric down lightly into the pattern shows where it should (and should not) go. (Alternatively, you can work over a light-table, or just hold the work up against a bright window). Use plenty of glue, and maybe work it through the cloth with a smooth wooden spatula. Then set this assembly aside to dry. When it *is* thoroughly dry, trim off any excess fabric with a razor blade and straightedge. With all this completed and the parts set aside, you want to tackle the lower action. This *can* get tricky, and there's a lot to explain. But first, just clean it up with a damp rag, getting all accumulated dirt out of the way. If you're lucky, the rubber cloth on the exhausters and reservoir are in good, tight shape, and the valves on the exhausters are soft and pliable... Yeah, right! It does happen, but not often. More likely, the reservoir has major holes, especially at the folds, and the exhausters likewise. If so, the fabric has to be replaced. There just isn't any practical way to "patch" this stuff; it *has* to hold wind; and you aren't going to want to take this contraption apart again any time soon!
But there are pitfalls here, too, and materials to be obtained.
Begin by taking out the screws, removing the straps, and parting the lower action from the foundation. If you are lucky, the foundation is NOT glued to the lower action: if you are UNlucky, it is, and you need to seek advice on how to get it apart. There is no practical way to recover exhausters if the foundation remains attached! (Mason & Hamlin was the worst offender in this regard, tending to use glue and *nails* to attach the foundation - permanently. They evidently had a lot of faith in rubber-cloth!)
In the USA, rubber-cloth is available from Organ Supply Industries, PO Box 1165, Erie PA 16512. There are several grades (weights): the direct replacement in nearly all cases is OSI's #6340-00, 0.02" thick, single coated black rubber on 20 oz. heavy cloth back. Avoid the fleeceback, heavier stuff, and the drill-cloth stuff as well. To do it right, you need several yards, so that the reservoir can be wrapped with a single piece, as it was originally.
The hinges in the reservoir and exhausters you may find to be leather, or heavy canvas. The latter, in convenient woven strips 2" wide, can be had at any place that makes awnings and such.
Leather can be had from many sources. For the hinges, you need a heavy cow-hide of nominal 1/16" thickness. For the exhauster valves, a heavy cabretta is best, but may be hard to find. On occasion I have used chamois *backed* by a thin cow-hide. The chamois makes a good seal, but is too flimsy by itself. The heavier leather holds it in place. These are not glued together, just tacked over one another. Columbia Organ Leathers has good supplies, but you have to buy whole skins.
Next, take some *important* measurements! You need to WRITE DOWN the maximum opening of the reservoir, and of the exhausters. Don't rely on memory here: the numbers are often close, but rarely the same, and it's easy to mix them up! Next, you need to observe carefully exactly how the material is applied, especially how it is "closed" at the hinge end. Make some sketches! These details, too, are easy to forget. Another way is to take electronic pictures, if you have a digital camera; these can be printed out and used later as guidance.
Some reservoirs have external springs: remove these, taking care to mark them so you can get them back exactly as they were.
If the reservoir has internal springs, some care is needed. Cut holes in the old reservoir covering and reach inside. Collapse a spring firmly in your hand and withdraw it. Then put one point against a firm surface and carefully allow the spring to open up. It will open into a very wide "Y", and if it gets away from you it can do major damage. Use eye protection at a minimum for this operation. Mark these so that you get them back in (later) in exactly the same position as they were originally.
Reed Organ Repair: A Generic Approach Part 3
Keyboard Glossary and Cleaning It
Before starting to strip the lower action further, take some time to inspect what you see carefully. Note especially which strips of rubber-cloth overlap which others: this will give you a clue as to the order these parts were wrapped in. Make some sketches of how the ends were done.
Lower actions tend to be of three types, with various hybrids. Some builders took considerable care with them, others "slapped them together". Your objective will be to re-do what you see before you in a manner as close to the original as possible.
Early instruments tend to have exhausters with ribs of wood or cardboard, all hinged together with leather strips and with leather gussets (the corner pieces). These are the toughest to do and make work right. As the pressure developed to make ROs cheaper, the style evolved that used a single piece of rubber cloth, often with ribs inside. As time went on, the ribs got smaller, until in some late instruments there were none. This rib-less design is the third style, and it really does not work well: I usually *add* inside ribs to this design.
In any case, you will want to *try* to save one exhauster "wrapper" to use as a guide. This means loosening up the glue joint, although if the cloth is not too rotten you can sometimes just pull it away from the wood and it will come off easily. An iron, not too hot, will usually soften the glue enough to let you remove one exhauster cover as a single piece. A heat gun can also be used, with great care.
Once you have this, the rest of the material can be taken off willy-nilly. There may be strips of wood glued and nailed to the divider, and sometimes along the edges of the exhausters and reservoir as well. If you can successfully remove these without destroying them, label them for re-use: otherwise, make new ones to match the old.
With the cloth all out of the way, use hot water on a rag to remove excess glue wherever you find it. A plastic pot-scratcher helps in the stubborn spots. You won't remove *all* the glue - just the excess. In good light, you can see where the glue remains because it is slick-surfaced. You want to get down to clean wood *everywhere*!
This done, inspect the hinges of reservoir and exhausters: ofttimes these are in fine shape, but
they may be utterly rotten. In the latter case, replace them for sure! Heavy leather, woven canvas, or whatever - try to match it reasonably well; glue it using hot glue, and be sure to keep the parts in their original relationship to one another. Avoid swapping the exhausters left for right - mark *everything* unobtrusively: letter punches, discrete pencil marks, whatever works for you. Heavy canvas or twill hinges need a *lot* of glue - work it into the fabric so it joins the coating of glue laid on the wood first. Then let it dry thoroughly (overnight is best).
The order of re-covering will be dictated by what you learned in your inspection at the beginning. I find most organs had the reservoir cover laid on first. If this is not the case with the one you are working on, return to this section at the appropriate time. The *width* of the reservoir cover is determined by the maximum opening of it, *plus* the material glued to the divider, *plus* any material that is folded over on to the face of the reservoir (Mason & Hamlin, usually), *PLUS* some "trim" - at least half an inch. The *length* of the piece to cut is the sum of the length of both sides *plus* the width, and again some "trim" - refer to your notes to see how much. **Measure twice, cut once!** Cut this strip of rubber cloth, and mark it's exact center end-to-end.
Put the action flat, exhausters down, on a work table. The next step is to fabricate a temporary arrangement, the exact details of which will vary, but the objective of which is to hold the reservoir *firmly* at its proper full-open position. Affix this to each *end* of the reservoir; a scrap of wood nailed with a *small* nail, and resting on the divider, is sufficient.
Now put a scrap of masking tape on the face of the reservoir, next to its bottom edge, and mark the exact center of the reservoir's bottom. Make a similar mark somehow to guide you on the divider board.
Have ready: plenty of un-interrupted time, hot water, some rags, hot glue, some push-pins, and a smooth flat hard-wood "stick": a piece of half-inch dowel sanded flat and slightly rounded works well, but almost anything will do. It must be smooth! Working from just beyond the center mark out to the ends, quickly apply a goodly layer of glue to the divider (non-movable) board where the material is to go. Using your marks as guides, place the strip of cloth over this glue, holding the extra out of the way temporarily with pushpins, (Note 2) and quickly work the material down into the glue with help of the stick; dampening the surface helps reduce friction. If enough glue was put on, some will squeeze out from beneath the cloth as you work it into place: remove this with a rag dampened in hot water. Watch for bubbles of air and work these out to the edge carefully. When this joint is made well, fold the material inside the open reservoir and lay an old towel over it and into the inside of the reservoir (to catch glue drips), apply glue to the edge of the movable part of the reservoir, remove the towel, and again using your marks as a guide, place the cloth in position. At this juncture you can shift it a trifle one way or another to avoid wrinkles. (Many builders were not averse to using small carpet-tacks to hold the rubber cloth until the glue sets: on the long parts, no more than one in the center and one close to each end. If any more tacks are need than these, the glue is not working, probably because not enough has been applied). When all is well, pin the excess cloth out of the way and work the joint down with the stick as before. There will be excess cloth beyond the edge of this joint: if this is just trim, leave the squeezed-out glue alone.
But if this is to be folded over on to the face of the reservoir, take out the excess glue with a rag and hot water, taking care to leave the actual glue joint undisturbed.
Once this joint is well made, you will do the ends of the reservoir, except in this case you have to prepare *both* surfaces for glue at the same time - you will see why when you do it! Read part 4 before moving on!
Note 2: Pin through the "selvage" (material that will be trimmed off), not through an area that will form the working part of the reservoir!
Continued in Part 4.
Reed Organ Repair: A Generic Approach Part 4
When this bottom joint of the reservoir cover is thoroughly made, take a break! Take an especially long one, if the springs are to go on the inside. One way to be sure a joint is "done" is to feel it with a sensitive part of your hand: if it is "cold and clammy", it is NOT ready. If possible, leave this overnight - then you will be sure!
Working through the still-open ends of the reservoir, insert the springs *carefully*: you will have marked them earlier to know which one is which, and which point impinges which part of the reservoir. Wiggle these a bit to be sure they are well "dug in".
You will now remove whatever contraption you made up to hold the reservoir open; it will now *stay* open because of the springs, and will stretch the rubber-cloth tightly. But if the springs are outside, you'll need to move your props "around the corner", being careful NOT to punch any hole in the new material (except on the glue joint itself).
The next step is pretty obvious: you'll wrap first one end, then the other, gluing both surfaces first. First, without glue, pull the flap of material into place, moving the free end to and fro until both corners pull tight. Use a piece of masking tape to indicate where the fabric will lie *after* gluing. Then apply ample glue to both wood parts, and pull the cloth back into position in such a way that it contacts the glue where it will actually lie, avoiding contact elsewhere. Work the joints down carefully, and apply the strip of wood over the joint (if there was one). Leave the excess on the movable part for later.
With both *ends* done, and well set up, you can begin the trimming operation. A *fresh* razorblade, applied from the outside of the cloth, and run quite flat along the wood will trim off the excess neatly. On the other hand, if the material is folded over on to the face, this can be done now, working the joint down tight, and mitering the corners. Then trim the excess, using a *sharp* blade against a straight-edge, and taking off excess glue with a rag and hot water.
Lastly, "close" the reservoir where the ends of the cloth fold over, using your notes to guide you on how it was done originally. There is usually a seal strip over the hinge, though this *may* go on *after* the exhausters are covered: again, your notes will tell you how to proceed.
Applying the outside springs and any small wooden guides for them will complete the covering of the reservoir. Be proud to show your friends what a neat job you did, and how much it looks like the original.
Continued in Part 5.
Reed Organ Repair: A Generic Approach Part 5
You are now ready to begin work on the exhausters. Take a moment to review your notes, to be sure you have all the details of how they are covered well established. You will, of course, replace the hinge if there is *any* doubt about its remaining longevity. And you will replace the inside valves. They are usually held by three carpet tacks at each end. If held in any other manner, follow the example that's before you.
DO NOT forget to put in the inside valves before covering the exhausters! They do not work well (at all!) without those inside valves. (Don't laugh - even I have made this mistake).
Recall that I mentioned earlier the three types of exhauster coverings: I will treat here only the most common sort, which is a single piece of rubber cloth with inside ribs. These are tricky enough, though the type consisting of hinged ribs and gussets is trickier! Get advice on doing that kind!
Using the old covering which you removed earlier as a guide, along with the measurements in your notes, cut a strip of rubber cloth: remember to cut this oversize, (wider) so that at the end of application you can trim off the excess neatly. Cutting a piece to fit *exactly* is impossible.
Lay this piece of rubber cloth out on a flat surface, rubber-side down: use masking tape at ends and edges to hold it straight and flat. Find the exact center of this piece, and make a heavy pencil line across the piece. Using your measurements and the old piece to guide you, make another pencil line the full length of the piece. This mark may not be exactly in the middle: the critical distance accounts for the material that will be glued to the divider board, *not* the movable board. Now measure the width of the movable board, and make two more cross-wise pencil lines half that width away from the center line in each direction.
To make new card-board ribs, use the old ones as templates. Almost any heavy card-board (*not* corrugated!) will do: artist's board works well. The ribs may be single piece, with a fold in their middles, or they may be separate pieces hinged together with a piece of leather. If the latter, apply the leather strips using hot glue, with the two halves of the rib facing each other, not flat! Let this joint set up well.
Next, lay out the ribs on the cloth, using your pencil marks and the old parts as a guide. The ribs fold on the length-wise center-line; the middle ribs are centered with respect to the marks for the ends of the movable board, and the side ribs are placed using the old ones as a guide. Place a small weight to hold each rib in place, and mark the position of each with a dark pencil. Write numbers or letters on the various parts and the corresponding position on the cloth, then set the ribs aside briefly.
I find it helpful to next tape off the areas *out*side the pencil tracings with ordinary masking tape. This helps prevent getting glue in spots where you don't want it. Have ready also some flat boards which will cover the ribs, and some fairly heavy weights: bricks, old window weights, whatever, and have your glue hot and ready. Working quickly, apply a coat of glue to the cloth *and* to the glue-face of the prepared ribs, and drop them into place. Put a board over them and stack up some weights, taking care *not* to shift the ribs as you do so. The glue is not set, and is a good lubricant, so it's easy to make this mistake!
All of the above must be done twice, of course. By the time the second cover has its ribs in place, the glue will have begun to set on the first. When all the ribs are in place and the glue has begun to set, remove the masking tape. Then stack the two covers, weight them down well, and leave them overnight.
The next day, the process of wrapping the exhausters actually begins. The approach is similar to doing the reservoir, with a few minor changes. You may need to prop one movable board open to give easier access to the one you are working on. Fold the cover and insert it between the two parts of one exhauster, center it carefully. A weight on the cover helps hold things. Then, glue the cover in place along the fixed divider board. Work this joint down well, and apply any wood strips that may have been over the cloth. Next, apply glue to the end of the exhauster cover, and pull the cloth up into position, leaving the ends to "flop around": the correct position of the cloth allows space for the rib to lie flat on the inside when the exhauster is closed. It is possible, if this joint is made with the exhauster open, to pull this joint up too tight, which makes the exhauster want to stay open: avoid this! There will be excess cloth, to be trimmed later on. Work this joint down well, and be sure the glue has begun to set up thoroughly before proceeding. A *single*
small tack near the end on each side may facilitate your work. (See Note 3). Apply wood strips now, if there are any.
It should be obvious that the sides of this exhauster will be covered next, by applying glue to requisite surfaces and pulling the cover into place carefully, avoiding breaking the ribs away from the cloth. Depending on just how close together the two exhausters are, you will need to have some wooden "spatulas" to help you work the inner joint down. If there's room for it, a wall-paper roller helps, too. As usual, take off squeezed-out glue with a damp rag. Using the wood strip (or an equivalent) as a guide, trim off excess cloth on the divider board only; leave the "tails" for last, and proceed to cover the second exhauster. The only trick here is to work the center portion of the cover into place, given that the adjacent exhauster is already covered. Don't worry, it *can* be done, and if you work slowly and methodically, it can be done neatly, just as it was originally. Install any wood strips over the cloth as you move along.
When the second cover is in place, you can return to the "tails" of the first, trimming and working them into place using your notes as a guide; a *few* strategically-placed *small* carpet tacks may help, but be careful to drive these into wood, not the flexible portion of the joint or the hinge. (See Note 3). When all the tails are tucked, the final seal strips that usually over-lie them can be glued on: leave these over-wide, and when *all* the glue is fairly well set up, trim off all the excess cloth using the *fresh* razor-blade technique.
Now stand back and admire your handiwork, and have a beer or "cuppa": if possible, leave the work to dry and set up overnight.
Note 3: (From the tacks collector) Small carpet tacks (#1 or smaller) to help hold rubber-cloth in place are useful: once the glue sets up, they are superfluous, but they're usually left in place. But if you need a *row* of tacks, you're doing something wrong! (I once removed well over a hundred tacks, including thumb-tacks, from a 10" x 10" exhauster on a M&H "Baby". Whatever glue they tried to use didn't "take", so tacks were relied upon, with predictably bad results.)
Continued in part 6.
Reed Organ Repair: A Generic Approach Part 6
It remains only to check out the rest of the lower action. If not already done, apply the outside valves and re-attach the foundation board to the reservoir. Renew the gasket here with soft leather if there is any doubt about the condition of the old gasket. Replace *especially* if it is made of felt, for felt really does not make good gaskets, despite its having been frequently used for them.
Note: The first time you "operate" a freshly covered (and dry) set of exhausters, you will hear fearsome "cracking and crunching" sounds: don't worry: this is glue that inevitably finds its way into cracks and crevices where it isn't needed, breaking loose. The same will likely happen the first time the reservoir is pulled shut when you eventually re-assemble the organ.
I usually apply new straps at this point, as it's easier to do with the lower action out of the case. Leave them extra-long. Any good awning shop can sell you 2-inch wide heavy twill-tape, which works especially well. (I'm sure we've all found all sorts of replacement straps, made from everything from old leather garment belts to plastic chair webbing. Twill works best, though).
It's a good idea to check on the condition of the rollers over which the straps will pass. It is not unusual to find these have been oiled at some point, the result usually being a nasty build-up of oil and dirt. Clean all this away. The traditional lubricant is tallow, nowadays difficult to find. Bacon-grease makes a fair substitute, aided considerably by liberal application of powdered graphite.
Now is the time, too, to do whatever needs to be done with the treadles. The boards are often found split or broken: make new ones from lumber-core of the correct thickness. If the old carpets are worn through, soak them off with copious applications of *hot* water. Replace these with something as close as you can find. You won't find an exact replacement, in most instances. Folks with wives may prevail upon same to do needle-point covers, which can be done up with a very close approximation of the original design. Glue them on with a heavy application of hot glue. If there are metal frames, these should be cleaned up with a wire brush; if they were painted, re-paint them to match the original as closely as you can.
All this accomplished, you can return the lower action to the case, and prepare to work on the upper action, to be treated in subsequent sections of this narrative.
Once the lower action is back in the case, the treadles are hooked up, and the exhauster springs in place, it is time to test your work. Seal the slot or holes in the foundation with masking tape, and seal the hole in the back of the reservoir where the dumping valve goes (or re-face and re-attach the valve itself). Then work the treadles: no more than four full strokes should be required to collapse the reservoir completely. When you stop treadling, the reservoir should open VERY slowly. If you have done your work well, it is likely to take several minutes for the reservoir to open up. The shorter the time, the poorer the work was done, and it will be necessary to treadle rapidly to get the organ to play satisfactorily. Assuming your work passes the test, remove the masking tape: you do not want to forget it is there and re-assemble the organ (as I have done at least once...).
A word here about screws seems called-for. These are part of the original fabric of the instrument, and should be preserved and re-used. Buffing on a wire-wheel is advised, especially if they are rusty. Apply a "wipe or two" of bees-wax just before re-driving the screws. This helps lubricate them, and slows reactions with components of the wood.
If you *must* replace screws (broken or munged heads, etc.) find the closest possible modern size, and if necessary re-bore the holes to avoid splitting. *Don't* use sheet-rock screws, or those blankety-blank-blank phillips-head things. Mr. Phillips hadn't been born, even, when the instrument you're working on was built, so the infernal things didn't turn up in ROs until *very* late in the game, and then on some Estey organs only, as far as I know... There's more about screws in Part 11.
Continued in Part 7.
Reed Organ Repair: A Generic Approach Part 7
With the lower action back in the case, it's time to pay some attention to the gasket between the foundation and the upper action. This has a large area, hence a large propensity to leak wind. Soft leather makes the best gasket here, but it is not unusual to find paper or felt: the latter is really too porous: always replace it. Heavy blotting paper works, but leather really "does it". You'll save much grief later, whatever material you use, if you punch holes where any screws or locating-pins pass through the gasket. Whatever you use, be sure joints between pieces of material are almost invisible: an amazing amount of wind can leak through a tiny imperfection in this gasket! It goes without saying that the gasket is held in place by a *light* application of modified horse hooves (hot glue).
With this chore out of the way, it is time to continue with the upper action. To the extent that it is not already dismantled, now is when you will take it *entirely* apart. Remember to number every item and keep copious notes regarding the arrangement of any parts you remove. Good idea to have a nice flat table in an out-of-the-way place to accumulate all the bits and pieces.
I usually remove the valves first, numbering them as I go. Tradition has it that the bass end is number 1, not that it really matters, as long as you're consistent. Lift the tip of each spring and place it *alongside* of its valve, resting on the soundboard. In most cases, the valves are "retained" by this spring's point dropping into a divot on the valve. If the felt and leather on the valve face are serviceable, a good cleaning may be all they need. In any event, taken them all
out, keeping them in order by arranging them on a flat board or some such.
If the springs are dirty or corroded, you may wish to remove these as well. Once again, it is *imperative* that these be kept in order. I have a big old knitting-needle that I thread them onto, through their loops. Grasp the base of the spring where it is pushed into the spring-rail and pull it firmly straight out. Nothing to it!
Next, with the action flat on a bench, begin pulling reeds. For this you need a reed hook and a steady hand. For now, prop the mute open with a small chunk of something. Reeds that have been in place for a hundred years or so may be loathe to come out of their cell tidily. It is *too* easy to bring out a chunk of a reed cell along with a tight reed, which complicates repairs tremendously. It is important to pull them out *straight* - no wiggling from side to side, as this tends to break cell walls. Work slowly and carefully! (Of course, some reeds all but fall out by themselves: your mileage may vary). Reeds that are especially tight benefit from a light tap *inwards* on the exposed butt: use a light hammer and small scrap of hardwood. Collect the reeds, in order, on small trays, strips of wood, or whatever is handy. Mark the carrier as to where the reeds go! "Front, lower, bass"; "rear, upper, treble", for example - whatever works for you. It may be a while before you put these back, so it is important to mark them unequivocally.
Depending on how long the organ spent in Aunt Maud's attic, you may find more or lesser amounts of "gunk" in the cells, some of which will come along with the reeds. Often this gunk is all that's left of felt that has passed through the alimentary canal of many generations of moths. So, it is moth droppings!
Finally, remove the mutes, which are usually held in place with small metal hinges. Leave the hinge on the mute, taking out screws of the leaf that is on the cell block. Pull the spring from the cell block as well, and leave other end on the mute. Mark each mute unobtrusively with letters to indicate its position, and set all these aside for now.
Note: Some mutes are held in place by leather and/or cloth hinges, often assisted by a small strip of tin and a couple of tiny nails. (Again, Mason & Hamlin in particular used this technique.) These are tricky in the extreme to re-do, so unless it is clear that the leather on the mute MUST be replaced, don't take these mutes out.
With *everything* out of or removed from the action, the next step is a thorough blowing-out of the reed cells and so forth. I have an air compressor and hose with a pistol-grip "shooter" on the end. This makes short work of this job. A flash-light shined into each cell is a good idea: you never know what manner of detritus lurks there. I've found huge moths, balls of "fuzz", shards of wood, none of which the air blast dislodged. A pair of tweezers, or a sharply-hooked piece of wire may be necessary.
Following the high-pressure air treatment, you will want to clean up the sound board, a small area of which is exposed in front of the cell block, and much more of which is exposed behind. A damp rag is the first approach. A bit of household ammonia in the water dampening the rag will help; strong ammonia solutions can (and will!) remove shellac, which you do NOT want to do at this point. Stubborn stains (usually mouse-pee) may require some 0000 steel wool. Take great
care to preserve any paper label that may be present with date, serial number or whatever!
The soundboard was usually shellacked, and the cleaning treatment may leave it a bit dingy. It *can* be refinished, though unless it is in really bad shape, I usually leave it alone. Alcohol on a rag will remove the old shellac, fine sandpaper will prepare the surface, and new orange shellac (3-lb cut) will bring the surface back to like-new condition.
Before doing this, however, inspect the soundboard closely for cracks. These are commonplace, and can leak a surprising amount of wind. The proper repair involves carefully opening the crack into a shallow "vee", and gluing in a shim of spruce, trimming to the surface, and refinishing. This is recommended for large cracks and ones which are fairly straight. Hairline cracks, or ones which have a lot of curves, can be filled. Another approach with hairline cracks is to glue a narrow strip of *thin* brown leather over the crack on the *inside* of the soundboard. This has to be glued tightly in place, as the pressure of atmosphere will tend to push it away from the crack, but the technique works and the minor unsightliness remains inside where it won't often be seen. Resist the temptation to use duct tape, or to fasten wooden strips over the crack. Neither technique will work at all.
With the action upside down, inspect the valve seats, guide pins and so forth. Replace any felt strips that the valve-tails may ride upon, if they are moth-eaten or missing. It is not unusual to find a fair amount of corrosion on the guide pins, usually accumulated where the valve rested. This seems to result from a chemical interaction between the brass pin and some ingredient in the wood. If this build-up is significant, pull each pin carefully, remove the corrosion with fine steel wool, and put the pin back in place with a *light* tap. A macho approach here can drive the pins right through the soundboard, which is a "bad thing" [tm].
You will probably need to replace the felt strips which the reed frame butts impinge right in front of the cells. I call it "bedding felt" for want of a better term. If the reeds were very loose, this decidedly must be replaced, and it is often the case that this felt has nourished many generations of moth larvae. Rip this felt out, and remove all traces of it with sparing applications of hot water, being careful not to let the water soak into the reed cells. Replace the felt strips, using hot glue, of course.
A word here about felt: really GOOD dense felt is getting hard to find. Many felts available now are synthetic materials which do not have the resilience and other qualities of true wool felt. You may have to do a good bit of looking to find something that works. Color is really unimportant; proper thickness is more important, and if the felt you use is too thick, the cells will be lifted up when you re-insert the reeds (a disaster!). Some experimentation may be required, and occasionally it becomes necessary to shim thin felt up into place with paper or strips of thin card. The objective is felt that seals wind leakage *under* the reed, and exerts only a small amount of upward pressure, to hold the reeds in place.
[For the purposes of this dissertation, we will assume all of the reed cells remain intact and properly glued to the soundboard. If this is not the case, consult an expert].
With all these chores behind you, re-facing the valves (if necessary) is the next step, to be
described in Part 8.
Reed Organ Repair: A Generic Approach Part 8
We turn our attention to the valves, proper operation of which is obviously critical to a successful refurbishment of a reed organ.
Others may have a different opinion on this topic, but I prefer to leave the valve facings alone, *if* they are in good shape. "Good shape" means that the felt is entire, without moth-larvae infestation, and the leather facing is similarly intact and not rotten or hardened from being wet. If you luck out on this, cleaning is all that's required. A *barely* damp rag will take off dirt or soot accumulated on the leather face, and similar accumulations of dirt on the sides of the felt can be blown off with the air-hose, or brushed away carefully; a soft-bristle tooth-brush works well. If this is all that's required, the valves can be placed back in their original positions after the cleaning described, to be held in place as before by the original springs.
But one is not always lucky! The task of cutting all those strips of felt and leather may seem daunting, but on most production instruments it was done in a really simple way.
Commence by laying all the valves on a flat surface with the facings up, and the valve butts aligned. You may be lucky again: the facings may be all the same length from bass to treble. Make a note of that length, and how far each facing is from one end of the wooden valve. However, there may be a group of facings that are the same length for a dozen notes or so, then a group of shorter facings, and so on. Measure the length of a typical member of each group, and note by number how many valves have that length, and jot down a little table, which might look something like this:
Notes Length, inches (cm, micropalmas, or whatever) 1-13 3.25 14-25 2.875 26-40 2.5 41-61 2.25
As you can see from the impression taken by the old leather, the objective is to cover the windways, with a "little extra". So long as this condition is met, the valves will do their job.
Next, make a pencil mark, or scribe a line, at the extremes of the facing on (using the example above) notes 1, 13, 14, 25, 26, 40, 41 and 61. This mark has to survive the cleaning of the valves, so scribing is usually best. A tiny punch-mark works, too.
This data taken, the next step is to strip the old facings from the valves; keep one or two as guides for the glue pattern, and throw the rest away. Get *all* of the old facing off the wood, by scraping, sanding, or the hot water treatment. There's usually very little glue, so this should be a simple task. If you have a belt sander, the task is simple: hold each valve in turn against the belt, with just enough time and pressure to yield a clean surface. Just be sure to keep your fingertips away from the belt.
Next, prepare the felt. Continuing the example, you will need a single piece three-and-a-quarter inches wide, and long enough to extend over the *width* of notes 1-13, with a bit of "spare"; another piece two-and-seven-eighths wide, long enough to cover notes 14-25; and so on. You might as well cut the leather now as well, since you need pieces of the same dimensions as the felt. About leather, a word a bit further on: lets get on with application of the facings first.
You need to make up a little "jig". First, place the piece of felt for notes 1-13 on a flat surface, and hold it in place with masking tape at the ends. Don't stretch the felt - let it lie naturally. Next, lay either #1 or #13 on top of this felt, and align the mark you made with the edge of the felt. Put a piece of masking tape on the surface you're working on, lengthwise alongside the felt, but the requisite distance from it so that the butt of the valves can be aligned to it. This is just a sight-line to guide you.
When all is ready (it takes longer to tell how to do it than to actually *do* it!), use a small artist's brush to apply glue to the cleaned valve face. This is usually a "line" of glue about an eighth of an inch wide; the old glue will usually show well enough that you can follow it as a guide. The glue should, for this purpose, be on the thick side. Once applied, allow it to set for moment or two, then place the valve face-down on the felt, aligning the butt with the piece of tape. Have handy a block of wood and a small weight, and put the wood on top of the valve, the weight on top of that. Prepare the next valve, place it *directly* next to the one already done, and replace the block of wood and weight. Continue until all 13 (or whatever) notes in this group are done. Remove the masking tape holding the felt to the table, move the whole lot out of the way somewhere, replace the weight in position, and go on to the next group. You'll have all 61 notes down on their felts in no time. [Of course, if you were lucky at the start and all the valve facings are the same size, you will proceed from one end to the other without interruption].
When the glue has set and these valves are sliced apart, you will have the job half done. The slicing is obviously critical, and you need a steady hand, one of which holds adjacent valves tightly together, and the other of which makes the slice. Best, here, is a *very* thin and *very* sharp skiver's knife, but a single-edge razor blade (changed often) does well. If the blade is held in pair of vice-grips, it's even easier (and safer). The blade must be held perpendicular to the work, and care must be taken not to slice the valve itself. You'll get the hang of it quickly!
It should be obvious that the leather is applied to the felt using the same technique, the only difference being that it was usually held with "dots" of glue, rather than a strip of it. It requires
very little glue, as you can see by tearing apart an old valve. Applying too much glue in these steps is the most common pitfall: it results in leather bunching up, and poor seating of the completed valve.
About leather: thin cabretta is wonderful - if you can get it. "Brownskin", as used for pouches in pipe organs, works well, too, but use the "thick" weight. In a pinch, chamois *can* be used, though it tends to be too "stretchy" and it is thus harder to trim the valves apart neatly. As to which face of the leather to use - the smooth or the fuzzy - I've found it both ways in reed organs, and the truth seems to be it really doesn't matter; follow the lead of the manufacturer, and use whichever face they used to go against the wind-ways. Whatever leather you use, avoid portions that have creases, warts, holes or other imperfections which might prevent a good seal of the wind-ways.
Resist the temptation to use felt that can be had nowadays "pre-glued": that glue loses its tack in a few years, and the felt will fall off the valve. Similarly, resist the temptation to use neoprene foam. This stuff will turn to goo in twenty years or so, converting the nice neat valves into masses of goop and dirt. Bear in mind that the felt you are replacing is likely a hundred years old, and that you expect your replacement to last just as long!
Working carefully and methodically, it should take no more than a few hours to re-face an entire set of typical reed organ valves. I say "typical", because there were a few manufacturers who threw a monkey-wrench into this process: early Mason & Hamlins, for example, included a tiny wooden "button" right under where the sticker rests on the valve: refacing these valves uses a different approach. But I won't go into that in this "generic" discussion.
Your completed valves are returned to their original positions using the numbers as a guide, to be held in place by the same spring that did so originally. It is important to avoid placing a valve with the leather face folded under at one end or the other, but otherwise, reinserting them is straightforward.
With the valves done, you can contemplate the job of cleaning the reeds, about which more in Section 9.
Reed Organ Repair: A Generic Approach Part 9
The time has come to discuss the matter of cleaning the reeds themselves.
It cannot be stressed enough here that the reeds, being the heart and soul of a reed organ, must be handled with great care. Still, they are surprisingly robust, in that they suffer the indignities of dirt and corrosion for years, but go right on speaking. The exceptions are the tiniest reeds in the treble octaves: the smallest dust mote can render one of these mute. At the same time, this characteristic of being tiny means they are the most delicate and most easily put out of order.
It is useful to distinguish degrees of dirtiness of reeds; three categories emerge, with some overlap, of course:
1. The reeds show no serious corrosion or severe discoloration, there being only some loose dirt on them.
2. There is no serious corrosion, but some discoloration and an evident buildup of black material along the edges and tips of the tongues, in addition to loose dirt or moth droppings.
3. In addition to the conditions in category 2, there is evident corrosion (verdigris), probably where mouse urine found its way into the action.
If you are fortunate to have reeds in category 1, what is necessary is to remove *all* the loose dirt, but otherwise leave the reeds alone. They will require touch-up tuning later, but for now, procure a fine artist's brush or badger shaving brush, and carefully brush off all loose material, moving *always* along the tongue from butt (rivet) to tip. Hold the reed by its butt and tap the tip of it on a hard surface with the reed tongue down: this action will cause the tongue to move away from the frame and loosen any specks lodged near the rivet. Finally, view the reed against a strong light to be sure there are no specks lurking anywhere in the small space between tongue and frame. You should see a clear line of light all around the reed. Dislodge anything found by this inspection by further brushing.
Purists may tell you that a brass reed should be polished to bright metal. However, the frame of the reed (save the area occupied by the tongue itself) is only a "support device", and while it may please one's aesthetic sensibilities to have this all shiny and nice, the effort is not necessary, and polishing in this manner compounds your chances of doing major damage to a reed tongue "by accident". This possibility should be minimized, as it will almost certainly be very difficult to find a replacement reed!
The more common situation, however, is that there is a buildup of dark material along the sides and tips of the tongues (Category 2). Most often, this is soot, especially if the organ spent much of its life in any part of the world which used coal for heating purposes. This material is somewhat greasy and should be removed. Similarly, Category 3 reeds need to have this black stuff *and* corrosion products removed.
Research on reed cleaning will reveal several formulae. A popular one is an expensive solution used for cleaning brass clock parts; its principal ingredient is ammonia. Another recommendation I've seen is for various kinds of toilet-bowl cleaners: I've never used these, so
cannot comment on their effectiveness. Since there is little resemblance between toilet bowls and reeds, my inclination is to steer clear of TBC for cleaning reeds. One formula reported to me is to be avoided: the use of vinegar and salt. Chemically, this solution results in the production of hydrochloric acid, and around any given grain of salt, the concentration of this can become so great as to create pits in the brass. Hydrochloric acid also tends to dissolve the zinc from brass preferentially, causing embrittlement. Vinegar *alone*, however, has been reported by some as effective. Whatever is used, it is *IMPERATIVE* to rinse away all traces of it.
I find ordinary household ammonia both cheap and effective: get the kind that does NOT contain detergent. This will not be used full-strength, and its only drawback is the need for good ventilation while using it.
You will need a good hard surface to work upon: a sheet of glass is good, as ammonia will not damage it. If working on a wood surface, be sure it is scrap you can throw away. You will need a small electric hot-plate with a thermostat, a pot of water, and a piece of glass to act as a cover for the pot. You will also need a small shallow tray of plastic (I use the foam trays meat comes packed in: it is also a throw-away item), and two containers for rinse water (I use cottage-cheese containers). Have at hand also a *soft* toothbrush. The air hose is *extremely* useful (indispensable, in my view), but I suppose you could get along without it: the drying step will just take a bit longer.
Arrange all to suit yourself. The process begins by mixing enough ammonia and tap water (use distilled water if you are in a *very* hard-water area). Start with a mix of 1 volume of ammonia from the bottle plus 5 volumes of water: if this does not appear to be strong enough, add small quantities of ammonia until it works well. This will take a bit of experimentation. Immerse a dozen reeds or so in this mixture, and allow it to percolate for a few minutes. (Start with the bass reeds, and work towards the treble). Remove one reed, place it on your work surface tongue up, dip the brush in the ammonia mix, and gently rub away the accumulated material you wish to have gone. This should be quite easy: if it isn't, increase the strength of the ammonia a bit. ALWAYS move the brush from the butt of the reed toward the tip, NEVER the other way round! Turn the reed over, and give a swipe or two to the underside of the tongue. Most of the dirt on a suction reed will be on the upper surface, however.
This process, if the mix is right, will remove soot and corrosion easily, leaving bright metal behind. It *may* be necessary to pay a bit of extra attention to the reed butts, where the mute leather has left a mark and possibly some corrosion. Large dollops of verdigris resulting from droplets of mouse urine may require a touch with a *dry* pencil-eraser, but a very slight discoloration left behind will do no harm, and it is best to go as easily as you can, especially on the tongues themselves. As you remove reeds from the drink, add new ones and slide them along in order, working you way up the scale, working ever more gently as you get to the smaller and smaller reeds.
When it is clear that the material you wish to remove is gone, dip the reed in the first pot of rinse-water, swish it around, remove it and shake off excess water. Repeat this in the second rinse. Hot (bearable to touch) water is desired here, and it should be changed often - every dozen reeds or so, or whenever you can *see* gunk in the first rinse water. Following the second rinse,
blow excess water from the reed using the air blast held some distance from the reed. Just get rid of the "bulk" water. Then place the reed on the glass plate over the pot of water held *just* at boiling. When you have accumulated a dozen or so reeds there, and the last of them is thoroughly heated, push the lot off the glass back onto a clean tray.
Proceeding in this way, a whole set of reeds can be effectively cleaned in a surprisingly short while. It is boring work, so take "breathers" often, and have some good music going in the background.
After all the reeds are clean and dry, replace them in their cells. A swipe along the edges with a block of bees-wax will help them slide into position. Push them straight in: no side-to-side "wiggling" is necessary or desirable, as it is easy to collapse the wall of a cell in this way.
A later episode may discuss what to do about missing reeds and broken tongues.
Continued in part 10
Reed Organ Repair: A Generic Approach Part 10
If you are with me to this point, the upper action is well along. Its valves have been removed, their facings cleaned or replaced, and returned to their original positions, and the reeds have been removed, cleaned, and replaced in their cells. Some attention must now be paid to the mutes.
If your organ is the type with mutes which are easily removed (metal hinges), you set the mutes aside earlier. If the leather face of these is in *excellent* condition, just dirty, it may be cleaned. But most often it has to be replaced. The *critical* step is trimming the edge which closes on the reed butts: there is usually a slight overhang of leather here. This, the most common type of mute, shuts down on the fronts of the cells tightly, using the small excess of leather along the bottom of the mute to seal around the reed frames which protrude from the cells.
Note: Some actions - notably Mason & Hamlin - use mutes which close a boxed-in area in front of the cells; vacuum is admitted to this area when the stop is off. There is a tiny hinged valve at the treble or bass end that opens when the mute is closed.
Once again, cabretta is excellent for mute leather. Go for a weight (thickness) as nearly that of the original as possible, erring on the thicker side if necessary. Select a portion of the skin that is
uniform in thickness, as variations will give you fits later. The "fuzzy" side always faces the cells.
Remove old leather by pulling it off. Clean the face with care on the belt sander, or use the hot water technique, using just enough to do the job; allow the cleaned mutes to dry *thoroughly*. Sizing should not be necessary, as they have had glue on them previously. Clean up all other surfaces of the mutes with fine sand-paper or 0000 steel wool. It is important to see that the mutes lie straight (the leathered face being the only important one). When placed on a dead-flat surface (a table-saw top, for example) there must be *no* tendency for the mute to "rock", and the entire face must be flat. Any twist or irregularity must be sanded out, and the active surface re-sized.
Cut strips of leather which are slightly too long and slightly too wide. Put a *thin* layer of hot glue on the mute face, and place it carefully on its leather strip, leaving an excess all around. Weight this mute briefly while moving on to the others, then leave all to set up and dry overnight. Trim the excess leather from the dry mutes by placing each one on a smooth surface and trimming with a razor-blade, using the wood as a guide. Trim the ends and the edge at the hingeside, leaving the other side alone for the moment.
This edge of the mute that has the small excess flap of leather is tricky to trim and get right. Most often, there will not be much wood there to use as a guide. There are a couple of approaches, depending on the mute's shape. *If* there is enough wood to use as a guide, tape a scrap of cardboard to a razor-blade such that this "shim" will hold the blade the requisite distance away from the wood as you make the cut. Another way is to use a very straight length of thin metal clamped in position such that it will prevent the blade from wandering too close to the mute itself. You may have to innovate here, since there are so many different shapes of mutes: but getting this little excess flap "right" is one of the keys to a successful job: without it, ciphers and partialciphers will be evident later.
To do the above properly, it is necessary to remove the hinges from the mute. If you do this, scratch small marks on a leaf of each hinge, and corresponding tiny punch-marks on the mute where each hinge is screwed on. This will assure that the hinges go back in *exactly* the same place from which they were removed. There tend to be slight variations from hinge to hinge, so getting them back in the same spot where originally installed helps prevent problems of alignment; the clearances are surprisingly critical! If the hinges are corroded, they can be cleaned on a rotating wire brush. If they work stiffly, they must be eased. Resist the impulse to oil them, as this invariably only works for a while. Instead, heat the hinge with a small torch, or even over the stove. When it cool again, work the leaves and blow the loosened dirt and rust out with the air hose. They will eventually work loosely. Leave them dry, and return them to use.
It often happens that the leather you use is enough thicker than the original to cause some binding of the mutes: they refuse to close cleanly. Small shims under the leaves of the hinges where these are screwed to the foundation will cure this problem. Trimmed neatly from thick paper, a business card, or whatever is appropriate, these will be held in place by the screws, so
they need not be glued. Some experimentation may be necessary to get it all right!
Once all the above is done, we will turn our attention to the coupler action (if present) and the keyboard.
Continued in part 11
Reed Organ Repair: A Generic Approach Part 11
Note: An earlier version of this article appeared in the Quarterly of the Reed Organ Society
THE TAMING OF THE SCREW being A TREATISE ON THE GENTLE ART OF SCREWING
with particular reference to reed organs, and enumerating the seven deadly sins of screwing by James B. Tyler, Recognized Expert on Screwing
When I was young, my father often said I was obsessed with screwing. Now that I am in my dotage, I am happy to say the situation has not changed. Neither I nor Archimedes was the first to screw: old Archie, however, was the first person to have a screw named after him, an honor also accorded to that idiot Phillips. Who it was to first conceptualize the process of joining "things" by applying Archimedes' principles has not been recorded, but the process was certainly well known by the beginning of the 16th Century, if not before.
This little treatise will be devoted to only three types of screw. Nowadays, there is a plethora of new kinds, most of them used for joining very specific materials, and often using special tools; of these there will be no discussion here. Nor will the word "Phillips" be used beyond this point. The three types of screw to be discussed are all devoted to the fastening of bits and pieces of wood, although in reed organ work, they are occasionally used to fasten metallic parts to wood. The three categories are Flat-head, Round-head, and Variants.
Old screws were fashioned from plain iron, or from brass. Screws were later made from varieties
of steel, and sometimes plated with zinc. All sorts of screws are still made of brass, though these are now getting expensive and difficult to find. Many old screws were "blued", a chemical surfacing process that has been abandoned in favor of zinc electroplate, both processes applied with the hope of reducing rust. Every screw has three basic parts: the head, the shank, and the threads. The shank is a smooth portion between the head and the part where the threads begin. The flat-head screw is designed to bear on its material in a hole tapered ("countersunk") to match the head, such that when properly driven, the head of the screw is flush with the wood surface. A round-head screw, on the other hand, bears on the material directly, and the head remains well above the joined surface. Flat washers are often used in conjunction with round-head screws; finishing and cup washers are used (less often these days) with flat-head screws.
Screws are driven in place (and removed) through use of a screw-driver. In reed organ work, the flat blade screw-driver working in a transverse slot in the head is universally encountered: other kinds of screws were used only rarely, and those very late in the reed organ manufacturing era. For this work, a driver with the correct shape of tip, carefully dressed, should be used. As screws come in a variety of sizes, so also screw-drivers, and it is prudent to match the two well. Mismating can lead to many problems, notably the "munging" of the slots, or slippage of the driver on to nearby woodwork.
Reed organs were, for the most part, assembled using screws. Now and then one finds nails, especially in casework, but in the actions, a bewildering array of screws of many sizes can be found. It is the use of screws that allows the action to be dismantled for repair. Keeping these screws separate, and getting them back into their proper respective places, seems to be one of the major challenges to folks working on reed organs. While it would seem evident that a countersunk hole requires a flat-head screw, it is far from unusual to find round-head screws driven into counter-sunk holes, and vice versa. The first of the "deadly sins of screwing", then, is to place the wrong type of head into the other kind of hole.
The second deadly sin - and this is one of which even organ builders were too often guilty - is not preparing the holes correctly for a screw to properly do its job. While it easy to say that a screw "fastens" something, it does so by a process of creating compression between two parts, so that friction (sometimes aided by glue) will prevent the parts from moving with respect to each other. In order to create this kind of tension successfully, the hole in one of the pieces must be drilled so as to permit free passage of the screw shank and any portion of the threads as well. All too often this point is overlooked by builders and repairers alike. Only when this condition is met will a screw (regardless of the type of head) create the kind of compressive force between parts which it was designed to do: if any part of the screw impinges on the part which will be under the screw head, inadequate compression will be obtained, and slippage of the joined parts can be expected. Modern gadgets which simultaneously drill the shank hole, the pilot hole, and the countersink must be carefully adjusted, or the various parts of the resulting hole will not be correct.
The third deadly sin (again common among builders) was to use the wrong size of pilot-hole. Worse yet, some fail to pilot at all! But, to do its job effectively, a screw requires a certain size of
hole into which the threaded portion goes: if the pilot hole is too small, splitting of the wood is likely, and if too large, the screw will not hold properly. Pilot hole sizes differ somewhat depending on whether the wood is hard or soft, but a pilot hole is important, and tables are available at any hardware store to guide the selection of pilot-hole sizes for the typically-found screw sizes.
The fourth deadly sin - very common, alas! - is driving screws into end-grain. One finds this in reed organs very often, and usually the original screw has been replaced by one much longer - and even then the screw has pulled out. End-grain, even in hardwood, does not grip the threads of a screw the way cross-grain does: it is the multitudinous fibers of the wood intersecting the threads at a steep angle that permit the screw to work.
The fifth deadly sin is that of over-tightening. Screws are capable of exerting enormous forces, which can result in great damage to wood when the compressive strength of the parts is exceeded. Due to the wedging action of the counter-sunk portion of a flat-head screw, splitting is the most common result of over-tightening flat-head screws, whereas crushing the wood under the head is the typical result of over-tightening a round-head screw. Both of these unfortunate results can be avoided by "knowing when to stop": this knowledge comes with practice. It is always better to leave a screw "on the loose side", since it can always be tightened a trifle more if necessary, for once a screw has been over-tightened, the damage is done and can't readily be un-done.
The sixth - and most common - deadly sin is that of "munging" the heads. Old screws often found in reed organs can be made of rather softer material than one finds today. On the other hand, old screws were far more carefully crafted. The use of screw-drivers with worn and rounded points is a very common cause of munging; the use of electrically-driven drivers is another cause, as these things can easily slip. Another cause is just plain careless application of a screw-driver, only placed half-way into the slot, located off-center, and so forth. Probably the most common cause of munged heads, however, is attempting to remove screws which have rusted in their holes. When the torque applied to the screw-driver exceeds the ability of the screw slot to contain it, the blade slips out, doing major damage as it goes, and often doing damage to surrounding wood as well.
Of "variants" there is not much to be said. Mason & Hamlin (and some others) used round-head screws with a "domed" head higher than most others; these are not available today at all, so it is important to retain them. Oval-head screws are occasionally found, especially in casework. The screws used to assemble a reed organ are an important part of the original "fabric" of the instrument; they should be cleaned and re-used. The seventh deadly sin is to throw away the screws and substitute modern ones. Old screws were manufactured using a machining process; their threads are sharply cut, and the edges of flat-heads are also sharp and well-defined. Modern screws are formed in dies under great pressure from blank billets, and are generally crude when compared to old ones.
Very rusty screws can be soaked in phosphoric acid-based metal treating compounds, but those only dirty or slightly rusty can be polished on a wire-wheel and made to look as new. For those
inclined to work with dangerous chemicals, blueing can be re-achieved by reference to "Henley's Formulas" and similar books
Removing screws that have severely rusted in place is tricky. The best approach is to apply a steady torque with a screw-driver while tapping on the handle with a light hammer. This technique may take a while, but it will always eventually loosen a screw. It is wise to take the time, since removing a broken-off screw is usually impossible. Another technique is to apply heat to the screw head; use a large electric iron (not a flame) and heat just long enough to drive a bit of odor out of the wood. Heating destroys enough wood fibers to release the screw, leaving a hole that will still receive the same size screw successfully.
When returning a screw to the hole whence it came, turn it backwards until you feel the lead thread "click" into the groove it cut originally: this assures driving the screw back into place without cutting a new set of grooves. Putting a screw in a couple of times without doing this guarantees a stripped screw hole.
No mention of screwing is complete without a brief mention of lubrication. The universally accepted lube is bees-wax, which not only eases the insertion of a screw into its hole, but helps reduce rust and thus helps assure the easy removal of the screw in future. Soap has sometimes been recommended, but is the worst thing to use, as it will inevitably contain traces of lye which will attract water and promote rust. Blocks of bees-wax can be obtained at any hardware store, and seemingly last forever; usually they are lost long before they are used up.
I return to regularly scheduled discussion in Part 12, following.
Reed Organ Repair: A Generic Approach Part 12
Once the mutes are back in place, their springs are attached, bits of felt are placed to prevent the springs from rattling (copy the old ones), and all is adjusted, you are ready to clean up and reassemble the swell flap mechanisms. These often need to be re-hinged after a thorough cleaning. The closest modern equivalent I have found to the paper/cloth hinge material is "bookbinder's tape", available at artist supply houses. It is pre-gummed, but don't rely on this: use hot glue. Suppress the notion of using duct-tape. Its adhesive fails in a few years. All this work is quite straightforward, just a matter of cleaning, replacing any worn or missing felt, and re-hinging: then re-assembling.
Attention is now turned to the "stickers", which were removed long ago and which have been kept in order. Some or all of these will have coupler buttons and felt punchings: again, cleaning the sticker and replacing the punchings is all that's required. Some stickers were graphited, but most were simply polished, and finest (0000) steel wool does a nice job of cleaning and repolishing these. As each sticker is completed, it is dropped into its respective hole. There may be a guide strip to be cleaned up first.
*******
If you've followed me so far, you've discovered that there is a certain amount of tedium involved in bringing an old reed organ back to life. A particular challenge in this regard is the coupler mechanism (assuming your organ has one). These are often seen as daunting tasks, and at first glance it may seem to be difficult. An axiom to remember though, is, "If it was once produced, it can be dismantled, cleaned, and reassembled".
Early coupler actions were often crude affairs, and often very "cranky" to adjust and keep working. But fairly early on the industry standardized on the "bent wire" action, which was produced for any number of builders in one factory: an early example of "outsourcing". I will discuss this type of action here; if yours is different, you may need to consult with someone who has had experience with one of the type you have.
In its earlier form, the bent-wire stack had the wires working in individual wooden pillow-blocks screwed to the bed. These are actually easier to work on than the later ones, where the pillow block is replaced by a metal one which is punched through the bed and crimped on the underside. Of course, you *may* be lucky to find one of these actions which requires nothing more than a good vacuuming to remove loose dirt. More often, though, you are presented with something that has accumulated masses of dirt which has fallen between the keys; some or all of the felt may have been reduced to rubble by moths; and the wires themselves are rusty and/or corroded.
Attacking one of these coupler actions requires care, patience, great attention to detail, and several hours of time at a minimum. The first step, as always, is to vacuum or blow out all loose junk. Then turn the whole thing over and remove any patches of wood or felt you find there. You will see the ends of the bearings bent over and crimped into the wood. With a sharp tool, each of these is bent up to point more-or-less straight up. Next, turn the action over again. Each wire, with its bearings, can now be lifted out. Make a note on paper somewhere of the *exact* relationship of the "legs" of the bearing (usually these are "short" and "long") with respect to the position of the bent wire. It is *important* to get these back on in the same relative position as they were originally. It is also a good idea to keep the wires in their original order. They can be numbered with an "electric pencil" on the under-side of each paddle. Or, they can just be stacked in order and treated in groups. Either way, remove the bearings, throw away any scraps of felt that may remain, and accumulate all the wires in order. The bearings can be mixed with out harm, and simply collected in any handy container.
Next, clean up the bed and re-hinge it if necessary (it usually is!), copying faithfully the original hinging (and using hot glue, of course). There is a strip of felt that lies under the wires that will
need to be replaced.
If the wires are only *dirty*, they can be polished up with 0000 steel wool. But if they are rusty, they need more powerful cleaning. Metal-etch cleaners based on phosphoric acid are useful here, followed by polishing with steel wool. The paddle ends can be polished up on a rotating wire brush. I find it convenient to do these in batches of a dozen as an aid to keeping them in their original order. The last step is a wipe with a clean cloth *barely* dampened with WD40, to retard future rust.
The bearing parts can also be soaked in metal-etch, rinsed well, dried and polished on a small wire-wheel (moto-tool size works very well). With all the cleaning and preparation done, you will need to cut the requisite number of new bushings. Thin felt was almost always used here, though I find thin red bushing cloth really works better. Each piece is 1/2-inch long by a width equal to that of the bearing, "plus a little": this is really not all that critical, and these parts can be quickly cut out using a razor-blade in a handle.
Naturally, reassembly consists of putting it all back together! Bend a cloth bushing around the wire and push a bearing over it: "fuss" with these parts until the joint of the ends of the bushing is directly between the two "legs" of the bearing, then squeeze these legs together (needle-nosed pliers help here). Put two bearings on each wire and push the legs into their respective holes. Do them all, then turn the assembly over on a strip of wood to press all the bearings "home". Rebend the tabs on the underside into the wood as they were originally. Replacing the felt pieces (where the actuating levers ride) completes the task. Re-install the completed action into the organ, and go have a nice cuppa (or a glass of beer), and congratulate yourself on a job well done!
You will be cleaning up the key-board next, a matter with which I will treat in part 13.
Reed Organ Repair: A Generic Approach Part 13
It is now time to turn our attention to the keyboard, one of the most important elements in a good reed organ repair.
The keyboard, considered as a unit, has many individual parts: here is a glossary:
BALANCE PIN: The pin at the tail of the key. This pin serves both to retain the key in position
front-to-back, and to keep the key upright.
BALANCE RAIL: The portion of the key frame which carries the balance pins.
BUSH: A verb, "to bush"; in essence, to create a bushed joint. The meaning of to "re-bush" should be fairly obvious.
BUSHING: Generically, the felt or bushing-cloth in a bushed joint. The fabric serves to ease movement and prevent rattle. On a reed organ keyboard, the key may carry bushings at the front pins. The balance pins are usually not bushed, though there are exceptions.
CATCH RAIL: (Key retainer) A strangely-shaped wooden piece at the rear of the keyboard which prevents the key-tails from rising when the front is pushed down.
COUPLER BUTTON: A wooden button attached beneath the key which transfers motion to the coupler wire. The joint is eased with a felt punching on the bottom face. These punchings frequently fall off.
CRUD: The stuff that falls through the cracks in a keyboard and lands on the parts below. Fossicking amongst this accumulata may tell much about the organ's history. For example, dnaanalysis of hairs found there may reveal that W. A. Mozart himself once tickled the ivories of your reed organ (or that Aunt Maude had a cat). You may also find missing knob-faces here.
FACE: The vertical part of the key that is exposed above the key slip.
FINGER GOO: The accumulation of dirt, oils and other detritus which accumulates on the sides of the keys. It is usually dark brown to black in color, and gives the keyboard an unsightly appearance as it is being played.
FRONT RAIL: The wooden piece of the key frame which carries the front pins and the thumper felt.
FRONT PIN: The pin under the business-end of each key which serves to prevent side-ways motion of the key. Oval pins may be turned slightly to take up wear of the bushing.
GRUNGE: (Not to be confused with crud, q.v.) The accumulation of dirt, soot, and whatever else has fallen through the keyboard, or been sucked in through the silks, deposited everywhere within the action. Removal of this stuff facilitates reed organ repairs. Purists in the "museum community" will hate you for discarding it. Save a vial-full if you must...
IVORINE: See Pyralin.
IVORY: The material derived from the tusk of an elephant which was once universally used to cover the naturals of keyboards of all types.
KEY: An individual component of the keyboard, upon which one places ones' fingers in the
appropriate way and sequence to produce - one hopes! - music. Usually 61 in number (five octaves); occasionally 73 (six octaves). Piano-cased reed organs often have 88 keys; not all of them are always functional!
KEY BED: Also, KEY FRAME. The assembly upon which the keys sit and "do their thing".
KEYSLIP: The portion of the casework which covers the action below the keyboard. This is usually easy to remove, to facilitate access to the reeds of the front organ.
MARKINGS: Dates, signatures, job numbers, tuners' information and other items of interest that have been placed on various keys, usually in pencil. Keys at the extremes of the keyboard are most commonly marked, but many others may gather inscriptions over the years. Document these on paper, and preserve them if you can.
NATURALS: The "white" keys.
NUMBERING: The keys on many reed organ keyboards have numbers stamped into them, usually near the tail.
PLATING: The material covering the white keys and (usually) fronts thereof.
PUNCHING: A disk (usually) of felt (usually) applied to a part (often to a button) to reduce noise when the part meets another.
PYRALIN: An early kind of plastic which was used in place of ivory. It is always applied in one piece, unlike ivory. Pyralin (and ivorine) are both VERY flammable, since they are both nitrocellulose. The plasticizer is camphor, which you will smell as you clean these keys
SHARPS: The "black" keys. Also, the individual pieces of wood which constitute the raised portion of the black keys.
STICKER: The round bit of dowel attached under each key which transfers motion of the key to the valve inside the reed pan. These are sometimes erroneously called "pitmans".
TAIL: The non-business-end of the key.
THUMPER FELT: A piece of thick felt (occasionally, punchings on each front pin) which limits the downward travel of each key, and which absorbs the sound of the keys "bottoming out".
VISE: A tool without which no repair shop is complete. Not to be confused with ADvice, something no one wants.
**************
For the sake of this discussion, we will assume that Aunt Maude's old reed organ has all its keys and plating, and that cleaning and adjusting are about all that's needed. An entire treatise could
be devoted *just* to keyboards, especially those needing more complicated repairs.
Still, reed organ keyboards have proven to be remarkably robust: in most cases, they can be made presentable and functional with very little effort. There is little point in trying to make them look "new", however, since they *aren't* new.
Most "run of the mill" or "garden variety" reed organs had keys plated with Pyralin, (also called ivorine) which only superficially resembles ivory. Pyralin is (or at least once was) white, and there the resemblance to ivory ends. But even in the halcyon days, ivory was more expensive than pyralin, so ivory is found only on early instruments, or the "upscale" products of later builders.
Pyralin is nitrocellulose filled with a whitener (probably chalk) and plasticized with camphor, the distinctive odor of which you will recognize whenever you work with pyralin. However, pyralin is EXTREMELY flammable (chemically, it is the same as nitrocellulose film base, which caused many a nasty theater fire until safety film was developed). Old pyralin can burn almost explosively if handled in the wrong way, so wherever "caution" is mentioned as work progresses, take heed!
**************
As with the rest of the instrument's various bits and pieces, the first step is to assure that the keys are numbered in order. They may have numbers stamped into them; or there may be numbers written on each key somewhere; or there may just be a pencil line drawn at an angle from one end of the keyboard to the other. Whatever method is used (or you plan to use), be *sure* it is in place before removing any keys from the frame. Even then, it is not a bad idea to keep the keys in order when you set them aside: there's really no reason not to.
The frame can now be cleaned and felts replaced. There's usually a strip of very thin felt rearward of the balance pins: this is often so completely eaten by moths that there's no trace of it left! And there's always a thumper felt in front, usually placed between two rows of front pins. In some instances, there is a single row of front-pins which protrude up through the thumper felt. In this situation, it's necessary to punch holes in the thumper felt - it is not practical to "poke" holes through it. It is important to find a felt for this service that is close to the same thickness as the original. Do your best!
As usual, dirt and old glue are removed with hot water, aided if necessary by brushes. The pins are best left undisturbed, and can be cleaned in place by a moto-tool with small wire brush. It is not essential that these be brightly polished, only that they be rendered smooth and free of deposited corrosion products or gunk. The clean, dry, re-felted frame should be re-attached to the action at this point.
One attacks the keys individually next. Each key gets the following attention, step-wise:
1. Sand both sides, and top and bottom with 200-grit garnet paper in a rubber holder. Cleaning the wood of the keys is not just a "cosmetic" step: it serves to make the completed keyboard look
nice, but removes the finger goo (and often, water stains and deposits of salt) that can make a keyboard look so "crummy".
2. Clean the plating of the naturals with 0000 steel wool. This works for both ivory and pyralin. Don't rub pyralin too *vigorously*! Too much friction can generate enough heat to ignite it. [*NEVER* use sand-paper on pyralin!] Stubborn stains on ivory can be sanded out with 600-grit paper and great care! At this stage, we are just getting the *worst* of the grunge off the keys. They won't "feel" right, yet.
3. Clean the sharps with care. If they are truly of ebony, the 0000 steel wool works well. If they are some other wood that has been stained black, steel wool work OK too, as it's likely you will want to re-stain. Painted sharps are the big problem: here, only a damp rag (possibly with a trace of oil-soap) will do. Fortunately, painted sharps aren't that common, and the paint is often not original - someone did a touch-up job along the way.
4. After completing the sanding, blow off loose dust with the air blast, and set the keys aside, keeping them in order.
Steps 1 through 4 should be done before continuing with:
5. The punching of felt on the bottom of the key which bushes the joint with the sticker should be replaced on each key. Since the keys are not all exactly the same width, it is best to use a piece of felt a trifle too wide, line it up with one side, glue in place, and trim off the excess.
6. Punchings on the coupler buttons should be replaced: many are likely to be missing. Don't forget that these gluing operations are all done with hot glue!
7. If the sharps must be re-stained or re-painted, now is the time to do it. Allow plenty of time for them to dry before handling.
8. Drop the keys onto their frame in order, and secure with the catch rail (just a few screws for now). You will almost certainly find the keys badly out of level, key-drop too shallow or too deep, and so forth.
Don't give up! A keyboard at this stage almost always looks rather bad, but a few hours of adjusting will put it right.
And that is the topic of Part 14, forthcoming...
Reed Organ Repair: A Generic Approach Part 14
With the keyboard clean and in place on the action, measure the drop of the two keys at the extreme ends of the keyboard. A keyboard feels "shallow" if the drop is much less than 3/8 inch, and feels "deep" if much more than that. Also check a key near the middle: whatever it is, the drop should be the same from end to end.
If the key drop overall is too shallow a thinner thumper felt is usually the best answer. Conversely, if the drop is too deep, a thicker felt (or a shim under what you have) is the best remedy. Get this matter settled first.
Leveling comes next: you will need a good straight piece of wood that you can drop on the key cheeks (if present) or on temporary blocks at the end of the key bed. Adjust things so that, when the stick is in place, the two white keys at the extreme ends *just* touch the underside of the stick: if some keys are high, you may at this point have to hold the guide down against your props.
You can try trading a few stickers, swapping short ones (where the front of the key is low) with long ones (where the front of the key is high). This is not always easy, especially if the organ is fitted with the usual bass and treble couplers. And, you can waste a lot of time trying this approach. It's better to proceed directly as follows:
To drop the front of a key, remove it and withdraw its sticker. Using a sanding block, remove a little material from the top end of the sticker. Go slowly here: it is surprising how little one has to shorten a sticker to make the front of the key come into place. (It's all governed by the laws of physics and leverage). Working with the white keys only, go through and drop all the high keys until they *just* impinge on the guide.
(Note: every time you have to take out a key, you have to remove the retainer, and reassemble everything. So, mark keys with a tab of masking tape, so you can do a series of them each time you take off the retainer. An alternative is to have a nice heavy *straight* piece of wood to place across the tails, just in front of the balance pins: using this, you don't have to put the retainer on until you are all done.)
Raising the keys is a bit trickier, and there are several ways to do it. You may find a key or two where slivers of wood have been driven in sideways, to make the key a trifle thicker at the critical point: I don't recommend this, as it's too easy to split old fragile wood this way. The best way is to peel back the felt on the bottom of the key, glue in a small paper (or thin card) shim, then put the felt back on. Small amounts of glue are needed here - resist the temptation to overdo it. A second way to raise the key is to glue small dots of paper or thin card on the top of the sticker. To do this with good permanent results, the end of the sticker must be sealed (it is endgrain, and glue will soak into it very quickly) before the first dot is applied. Apply a small bit of fairly thin glue and let it dry: then a bit more glue and the dot. Failing to "size" the end of the stick will allow the dots to fall off easily, spoiling your work. Dots can be made using an arch
punch or a leather punch: the dot should be as close to the sticker's diameter as you can get.
Yes, it is frustrating and slow, but it works, and the longer you work at it, the better and better the keyboard begins to look. When all the white keys are level, raise your guide, and level the black keys.
With key drop and level adjusted to your satisfaction, get back from the keyboard a little ways, get your eyes down to the same level, and observe the key fronts: some keys may appear to tilt one way or another. Correct this by tapping the top of the balance pin in the appropriate direction: place the tip of a screw driver on the exposed tip, and hit it with the butt of your fist. You'll quickly learn how hard to hit, and of course, if you go too far, hit it back the other way. The objective is to make the spaces *between* the key fronts as uniform as possible in appearance. Occasionally, it may be necessary to reach in with pliers and bend the front pin slightly to move the front of a key one way or another to even up the key spacing.
Lastly, check the keys for side-to-side wobble: each key should be completely free to move on its front pin, but there should be almost no side motion possible. In very bad cases, you may have to re-bush the entire keyboard. Very often, though, turning the front pin (if it is oval) will take up the slack. Now is the time to go through and do that. (Some early organs and melodeons did not use bushings on the key pins" excessive wear on these is difficult to reverse: consult an expert).
And that is the topic of Part 15, forthcoming maybe in the future...